Saturday, December 31, 2005

Ubuntu 5.10 (Breezy Badger) Step-by-step Guide for Dual Boot Installation

I am installing Ubuntu 5.10 Breezy BadgerSo lets begin with insertion of Install CD in Cd-drive and booting from
the CD-Rom...
1)Once the CD Autoboots, you would get a Ubuntu Logo Screen with 'boot' prompt...
2)Press ENTER to begin the installation
Note: Entire Installation is in TEXT-Based Mode, no GUI-based is available.
3)It would prompt for 'Choose Language', select English
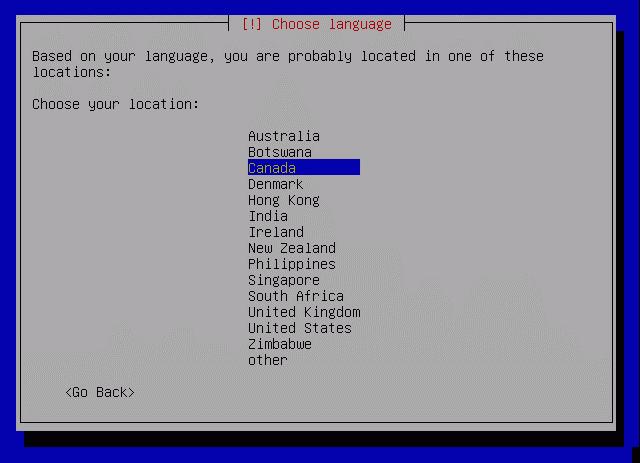
4)Now it prompts for 'Choose Location', select as appropriate5)Keyboard Layout selection confirmation dialog appears...confirm and press ENTER
6)Now various hardware detection and IDE,Ports configuration would take place...so sit back and relax
7)Various Modules and Softwares would be Unpacked next...
8)Network configuration box appears.. It wud try auto-detect via DHCP or if it fails, it would ask whether you want to configure ManuallyYou can select as appropriate...
Note: If you use DSL or PPPoe type Internet Connection, do not configure your internet manually, just skip to next step
9)Now it prompts for the Hostname... by default it says 'Ubuntu', you can configure it to anything...its just like Computer Name while Windows Installation
10)Now main part comes is Partitioning of Disks...
Now, select your appropriate HDD(in-case of multiple hdd's)..
Mostly it would be something like
Erase entire disk: IDE1 master(hda) - 37GB, etc..
11)Next screen it would show you two partitions made, one of 'ext3' filesystem and other a 'SWAP' partitionIf you selected the proper HDD in earlier step... select YES for 'Write Changes to the disk'
12)Now installation of Base System would begin so sit back and enjoy..
13)Timezone configuration box prompts after above step..select your Timezone and confirm
14)Now user setup comes up... Enter your full name for the User, in next screen select a short username for logon (This username is what you would use to login) and then the password bviously!
15)Now, the Boot Loader configuration comes... If it shows your already installed Windows Installation, like Windows XP Professional.. its safe to install the Boot Loader on MBR without any problems...
16)Now, it would prompt for a REBOOT... upon reboot..enter your Bios and put First Boot Priority to Harddisk i.e. ur Windows one
17)Now, it would show you Loading GRUB 1.5..and then list various OS...with 4 entries for ubuntu and under Other Operating Systems, it would list Windows XP Professional
18)Boot your Ubuntu, the first in the listit would complete the remaining installation
19)Now X-Server Configuration appears.. select the various resolutions your monitor supports and confirm
20)Thats it.. your installation is completed and your Ubuntu Logon screen appears.. Put in your 'username' used in step14 and password to get inside.
Now, after installation you can reboot and use your Windows XP by selecting it from the Boot Menu

If you want to configure Windows XP as the default OS for booting each time, boot into Ubuntu Navigate to My Computer>Filesystem>boot>grub>menu.lst
Open the menu.lst file in text editor..it wud be having something like this at start:

# Generated by grubconf-0.5.1
default=1
timeout=10

Change the default=1 to default=4
Thats it...now your XP is the default booting system next time onwards.

Enjoy your Ubuntu..and do let me know if you face problems..
Few Screenshots...


A comprehensive list of screenshots while installation can be checked at: http://shots.osdir.com/slideshows/slideshow.php?release=342&slide=1

Keywords: breezy badger,edubuntu,free,installing ubuntu,linux,linux operating system,linux os,linux support,open source,operating system,software,ubuntu,ubuntu desktop,ubuntu download,ubuntu how to,,ubuntu install,ubuntu laptop,ubuntu linux,ubuntu screenshots,ubuntu server,xubuntu

Thursday, December 29, 2005

IndianGuitarTabs Search Plugin for Mozilla Firefox (Windows/Linux)

IndianGuitarTabs.com Search Plugin is a simple Search Plugin for Mozilla Firefox on both platforms of Windows & Linux
It helps user to directly search for Guitar Tabs/Chords for the site IndianGuitarTabs.com
Since, i am the Technical Administrator for that site, i picked up on the idea by an existing user(Apurbajd) and further modified the plugin for both platforms...

Installation:
For Windows Users...download the file IndianGuitarTabs_Search_Plugin_Windows.zip, unzip and run the setup program for easy installation
Note: If the Installer doesnt pick up the correct location for installation...then please manually browse to the directory:%WindowsRoot%\Program Files\Mozilla Firefox\searchplugins
For Linux Users...download the file IndianGuitarTabs_Search_Plugin_Linux.zip
The Archive contains a readme which would guide the installation procedure for Linux..

A screenshot from Firefox on Windows & Linux has been also attached...Enjoy and have fun..

TestBeds:
Windows: Mozilla Firefox 1.5
Linux (Ubuntu 5.10): Mozilla Firefox 1.0.7

(Windows) (Linux)


Downloads
Windows: http://www.indianguitartabs.com/attachment.php?attachmentid=2981
Linux: http://www.indianguitartabs.com/attachment.php?attachmentid=2982

View my(zoomingrocket) original thread on IndianGuitarTabs.com at:
http://www.indianguitartabs.com/showthread.php?t=16546

Keywords: firebird plugin,indianguitartabs,,indianguitartabs com,mozila plugin,search add,search codec, search engine plugin,search engine plugins,search my,search plugin,search plugins

Wednesday, December 28, 2005

Prince of Persia: The Two Thrones

Moving ahead from last year’s huge success of the Prince of Persia: Warriors Within, The Two Thrones promised more for its fans.

The disappointing aspects of earlier games like ‘too dark’ were studied and taken care off here.The game begins with Prince returning to Babylon with his new found love Kaileena…only to find the city under fire.The rescue operations are needed to be initialised, but tragedy struck when Kaileena gets kidnapped by a local villain and killed.Then began the journey to again conquer all forces and regain his Throne.To add agony, the Prince is caught up with the ‘sandy virus’, which is manifested in the form of the sarcastic ‘internal voice’ (split-personality), which loves to argue on the different themes. Now and then it not to be selected away outside - and prince becomes dark-skinned creation in the painted patterns with the habits of pitiless, ruthless killer.

Read my entire review on GamersIndia.com:
http://www.gamersindia.com/Reviews/Prince-Of-Persia-The-Two-Thrones/

Keywords: game thrones,prince of persia game,prince of persia games,prince of persia guide,prince of persia review,prince of persia reviews,prince of persia rival swords review,prince of persia screenshot,prince of persia the two thrones,prince of persia wii review,review games

Guide: Windows Xp Home / Pro Sp2 Visual Theme Hack

DISCLAIMER: Follow this guide at your OWN risk! This may render your system unbootable or permanently damaged.
This procedure involves replacing your existing Windows Visual Theme DLL file(uxtheme.dll) to its hacked version so that it can allow NON-SIGNED Visual Themes i.e. Not Officially distributed by Microsoft.


Before we proceed further... do a system check!No SHELL Replacement Programs like WindowBlinds or TalismanNo previous attempts to hack the Visual Theme DLL OS: Windows XP Home/Pro with Service Pack 2Browse to %Systemroot%\WINDOWS\System32\Find uxtheme.dll file and right click>Properties>Version TabThe File version should be: 6.0.2900.2180 (Check Screenshot)


If you dont have this File Version listed for your uxtheme.dll file, then please stop here and do not follow this guide further as it would be unfit for your system.

BACKUP: Now make a folder somewhere and copy your current uxtheme.dll file, just incase you want to have some chances of recovering a failed hack!
DownloadsOnce its confirmed that your system is ready for the hack, download a very small program called 'Replacer' from the given URL.Replacer is fav program of many system hacker as it allows you to replace a DLL file while your WINDOWS is UP and RUNNING!

Generally, you cant replace a System's DLL when your WINDOWS System is ON!So get the REPLACER(10KB)! http://www3.telus.net/_/replacer/Replacer.zip
Another file that you need is the hacked version of original uxtheme.dll(112KB) file!Get that from: http://www.neowin.net/forum/index.php?act=Attach&type=post&id=122794
After downloading this file, unzip and do the same 'File Version' check as we did for the original uxtheme.dll

STEPS Ok.. now all set, lets began to replace the DLL File!

1) Unzip REPLACER Double Click: Replacer.cmd file(NOTE: Those using Microsoft Antispyware BETA, may get a popup asking permission for running the script... Please select 'ALLOW')At IDLE Stage, your Replacer.cmd looks like in screenshot...


2)Now as the screen text says.. you have to DRAG your ORIGINAL theme file to the Replacer Window! (i.e. Drag your uxtheme.dll file from %Systemroot%\WINDOWS\System32\) When you do this, the Replacer Window would show the path to that file! (Check screenshot) Now press ENTER


3)The next window would ask you to drag the replacement uxtheme.dll file, i.e. the hacked dll file which you downloaded! (Check: Screenshot)Drag that from the place where you UNZIPPED the file..as earlier it would again show you the path from where you dragged! (Check: Screenshot)


4)It would show you both the paths of Original & Replacement File and ask whether to Continue replacement or not? (y/n) (Check Screenshot)Generally, if you followed my earlier steps without any error.. you can blindly type 'y' and press ENTERAs soon as you confirm, it would start the process of REPLACEMENT and it would say:
* uxtheme.dll-
Copying to ServicePackFiles...
-Replacing system file...
Complete. Reboot to see changes.Press any key to quit.(Check Screenshot)


5)Now as it says, "press any key to quit", that Replacer Program and Manually RESTART the system and logon!If you are able to Login or rather see your DESKTOP then you have done everything correctly!
6)Its time for adding VISUAL THEMES to your system now!My two favs are:Windows Vista(1,519KB): http://www.deviantart.com/view/22150948/Fedora Core(Blue_Curve_4.3)(188KB): http://www.deviantart.com/deviation/4279121/
Uncompress the file and copy the Folder containing "Windows Visual Style File" type to: %Systemroot%\WINDOWS\Resources\Themes\i.e. for example, if you have going for the Windows Vista, there is a folder named "Vista", copy that entire folder to Themes folder or if you have got the Blue Curve(Fedora Look), copy the folder 'Bluecurve 4' & 'Thincurve 4' to the Themes directoryNow, its the time to DISCO
7)Reach the APPEARANCE Tab...from where you used to shuffle for Windows Classic or Windows XP Look...There you would find Vista Listed, select it and Press APPLY! (Check Screenshot)

Now, for the first time, that Please Wait would take quite a time to GO.. dont PANIC!But in subsequent apply of any other new theme would be FASTER!
8)So thats the way to go...Now any new Visual Themes you download, are to be unzipped, and the respective folder to be copied to the Themes folder and its done!
Visual Themes Repository: http://www.neowin.net/forum/index.php?showforum=36http://www.deviantart.com/

Notes: %Systemroot% corresponds to the Partition where your Windows XP is installed! e.g.(C:\ or D:\ ...)

DISCLAIMER:Once again, i am warning you... if you dont know how to recover from a system crash or your PC is under warranty, dont go for this procedure!

Disclosure Policy

This policy is valid from 14 July 2009

  • This blog is a collaborative blog written by a group of individuals. For questions about this blog, please contact shalabhkatdare AT GmailDOTcom.
  • This blog accepts forms of cash advertising, sponsorship, paid insertions or other forms of compensation.
  • The compensation received will never influence the content, topics or posts made in this blog. All advertising is in the form of advertisements generated by a third party ad network. Those advertisements will be identified as paid advertisements.
  • The owner(s) of this blog is not compensated to provide opinion on products, services, websites and various other topics. The views and opinions expressed on this blog are purely the blog owners. If we claim or appear to be experts on a certain topic or product or service area, we will only endorse products or services that we believe, based on our expertise, are worthy of such endorsement. Any product claim, statistic, quote or other representation about a product or service should be verified with the manufacturer or provider.
  • This blog does not contain any content which might present a conflict of interest.

Privacy Policy

Geek Talkin respects your privacy.
Any personal information you provide to us including and similar to your name, address, telephone number and e-mail address will not be released, sold, or rented to any entities or individuals outside of Geek Talkin.
Credit card details
Geek Talkin will never ask for Credit Card details and request that you do not enter it on any of the forms on Geek Talkin.
External Sites.
Geek Talkin is not responsible for the content of external internet sites. You are advised to read the privacy policy of external sites before disclosing any personal information.
Cookies
A "cookie" is a small data text file that is placed in your browser and allows Geek Talkin to recognize you each time you visit this site(customisation etc). Cookies themselves do not contain any personal information, and Geek Talkin does not use cookies to collect personal information. Cookies may also be used by 3rd party content providers such as newsfeeds.
Remember The Risks Whenever You Use The Internet
While we do our best to protect your personal information, we cannot guarantee the security of any information that you transmit to Geek Talkin and you are solely responsible for maintaining the secrecy of any passwords or other account information. In addition other Internet sites or services that may be accessible through Geek Talkin have separate data and privacy practices independent of us, and therefore we disclaim any responsibility or liability for their policies or actions.
Please contact those vendors and others directly if you have any questions about their privacy policies.

For any other information email webmaster